21  Spatial Operations and Maps

Often we will have one or more spatial layers and we will want to perform operations on them. These operations might fall into various categories:

You do not need to memorize the names of the functions that do these things. What you do need to understand is exactly what is being asked in a question, and what you want the final result to look like. For example, if I said that a field is in two different risk zones, and I want to know how much of the field is in each zone. Then we need to know that we can intersect the field with the two risk zone polygons, creating a polygon out of the area of the field in the first zone, and a polygon out of the area of the field in the second zone. Then we can measure the area of each of those polygons.

You should also be familiar enough with the functions to be able to look at them and determine what they are producing and whether there is an error in the way they are being used.

A big part of this chapter is working with multiple spatial layers. In particular, we will work with three datasets:

  1. The RM boundaries: sask_rms.geojson.
  2. Risk zone boundaries: sk_risk_zones.geojson. These risk zones are set by Saskatchewan Crop Insurance Corporation, and are used to set crop insurance rates. They reflect areas that are thought to share common growing conditions, and are not based on RM boundaries.
  3. The 2023 Annual Crop Inventory: aci_slice_2023.tif, a raster dataset that shows what crop was grown in each 30-metre cell of agricultural land. The slice we use covers four RMs north of Saskatoon. The codes it stores are named in aci_crop_classes.csv.

21.1 Working with multiple layers

21.1.1 Coordinate reference systems

In Chapter 19 we learned about coordinate reference systems, which tell us what a pair of numbers means on the ground.

When we work with multiple layers we must make sure that we are using the same coordinate reference system for all of them. If we are working with a vector layer and a raster layer, we will need to reproject the vector layer to match the raster layer. If we are working with two vector layers, we can reproject either one to match the other. The important thing is that they are in the same system before we do any operations on them.

Let’s start by reading in their data and checking their CRS using the function st_crs(). We can also see if they have the same CRS by using the == operator. For example, if we type st_crs(data1)==st_crs(data2) we will get TRUE if they are the same, and FALSE if they are different.

library(sf)
library(terra)
library(janitor)

##The RM boundaries
rms <- st_read("data/sask_rms.geojson", quiet = TRUE) |>
  clean_names() |>
  mutate(rmno = as.numeric(rmno))

##The crop inventory raster, and what its numbers mean
aci <- rast("data/aci_slice_2023.tif")
classes <- read_csv("data/aci_crop_classes.csv", show_col_types = FALSE)
levels(aci) <- classes

##The 23 grain risk zones
zones <- st_read("data/sk_risk_zones.geojson", quiet = TRUE)

##Print the CRS of each layer
st_crs(rms)
st_crs(zones)
st_crs(aci)

##Is the CRS of rms the same as the CRS of zones?
st_crs(rms)==st_crs(zones)

##Is the CRS of rms the same as the CRS of  aci?
st_crs(rms)==st_crs(aci)
> library(sf)
> library(terra)
> library(janitor)
> 
> ##The RM boundaries
> rms <- st_read("data/sask_rms.geojson", quiet = TRUE) |>
+   clean_names() |>
+   mutate(rmno = as.numeric(rmno))
> 
> ##The crop inventory raster, and what its numbers mean
> aci <- rast("data/aci_slice_2023.tif")
> classes <- read_csv("data/aci_crop_classes.csv", show_col_types = FALSE)
> levels(aci) <- classes
> 
> ##The 23 grain risk zones
> zones <- st_read("data/sk_risk_zones.geojson", quiet = TRUE)
> 
> ##Print the CRS of each layer
> st_crs(rms)
Coordinate Reference System:
  User input: WGS 84 
  wkt:
GEOGCRS["WGS 84",
    DATUM["World Geodetic System 1984",
        ELLIPSOID["WGS 84",6378137,298.257223563,
            LENGTHUNIT["metre",1]]],
    PRIMEM["Greenwich",0,
        ANGLEUNIT["degree",0.0174532925199433]],
    CS[ellipsoidal,2],
        AXIS["geodetic latitude (Lat)",north,
            ORDER[1],
            ANGLEUNIT["degree",0.0174532925199433]],
        AXIS["geodetic longitude (Lon)",east,
            ORDER[2],
            ANGLEUNIT["degree",0.0174532925199433]],
    ID["EPSG",4326]]
> st_crs(zones)
Coordinate Reference System:
  User input: WGS 84 
  wkt:
GEOGCRS["WGS 84",
    DATUM["World Geodetic System 1984",
        ELLIPSOID["WGS 84",6378137,298.257223563,
            LENGTHUNIT["metre",1]]],
    PRIMEM["Greenwich",0,
        ANGLEUNIT["degree",0.0174532925199433]],
    CS[ellipsoidal,2],
        AXIS["geodetic latitude (Lat)",north,
            ORDER[1],
            ANGLEUNIT["degree",0.0174532925199433]],
        AXIS["geodetic longitude (Lon)",east,
            ORDER[2],
            ANGLEUNIT["degree",0.0174532925199433]],
    ID["EPSG",4326]]
> st_crs(aci)
Coordinate Reference System:
  User input: WGS 84 / UTM zone 13N 
  wkt:
PROJCRS["WGS 84 / UTM zone 13N",
    BASEGEOGCRS["WGS 84",
        ENSEMBLE["World Geodetic System 1984 ensemble",
            MEMBER["World Geodetic System 1984 (Transit)"],
            MEMBER["World Geodetic System 1984 (G730)"],
            MEMBER["World Geodetic System 1984 (G873)"],
            MEMBER["World Geodetic System 1984 (G1150)"],
            MEMBER["World Geodetic System 1984 (G1674)"],
            MEMBER["World Geodetic System 1984 (G1762)"],
            MEMBER["World Geodetic System 1984 (G2139)"],
            ELLIPSOID["WGS 84",6378137,298.257223563,
                LENGTHUNIT["metre",1]],
            ENSEMBLEACCURACY[2.0]],
        PRIMEM["Greenwich",0,
            ANGLEUNIT["degree",0.0174532925199433]],
        ID["EPSG",4326]],
    CONVERSION["UTM zone 13N",
        METHOD["Transverse Mercator",
            ID["EPSG",9807]],
        PARAMETER["Latitude of natural origin",0,
            ANGLEUNIT["degree",0.0174532925199433],
            ID["EPSG",8801]],
        PARAMETER["Longitude of natural origin",-105,
            ANGLEUNIT["degree",0.0174532925199433],
            ID["EPSG",8802]],
        PARAMETER["Scale factor at natural origin",0.9996,
            SCALEUNIT["unity",1],
            ID["EPSG",8805]],
        PARAMETER["False easting",500000,
            LENGTHUNIT["metre",1],
            ID["EPSG",8806]],
        PARAMETER["False northing",0,
            LENGTHUNIT["metre",1],
            ID["EPSG",8807]]],
    CS[Cartesian,2],
        AXIS["(E)",east,
            ORDER[1],
            LENGTHUNIT["metre",1]],
        AXIS["(N)",north,
            ORDER[2],
            LENGTHUNIT["metre",1]],
    USAGE[
        SCOPE["Navigation and medium accuracy spatial referencing."],
        AREA["Between 108°W and 102°W, northern hemisphere between equator and 84°N, onshore and offshore. Canada - Northwest Territories (NWT); Nunavut; Saskatchewan. Mexico. United States (USA)."],
        BBOX[0,-108,84,-102]],
    ID["EPSG",32613]]
> 
> ##Is the CRS of rms the same as the CRS of zones?
> st_crs(rms)==st_crs(zones)
[1] TRUE
> 
> ##Is the CRS of rms the same as the CRS of  aci?
> st_crs(rms)==st_crs(aci)
[1] FALSE
The last two lines of code show that the RM boundaries and the risk zones have the same CRS, but the crop inventory raster has a different CRS. We will need to reproject the RM boundaries to match the raster before we can do any operations on them. We can do this using the st_transform() function. This function needs two arguments: the first is the layer to be reprojected, and the second is the CRS to reproject it to. We can get the CRS of the raster using st_crs(aci). The code below shows how to do this:

##Re-project the rms and zones data
rms <- st_transform(rms, st_crs(aci))
zones <- st_transform(zones, st_crs(aci))
> ##Re-project the rms and zones data
> rms <- st_transform(rms, st_crs(aci))
> zones <- st_transform(zones, st_crs(aci))

Now let’s plot all of our three data sets together.

ggplot() +
  geom_sf(data = rms, fill = "grey95", colour = "grey75", linewidth = 0.1) +
  geom_spatraster(data = aci) +
  scale_fill_manual(values = setNames(classes$colour, classes$crop),
                    na.value = "white", guide = "none") +
  geom_sf(data = zones, fill = NA, colour = "red", linewidth = 0.4) +
  theme_void()
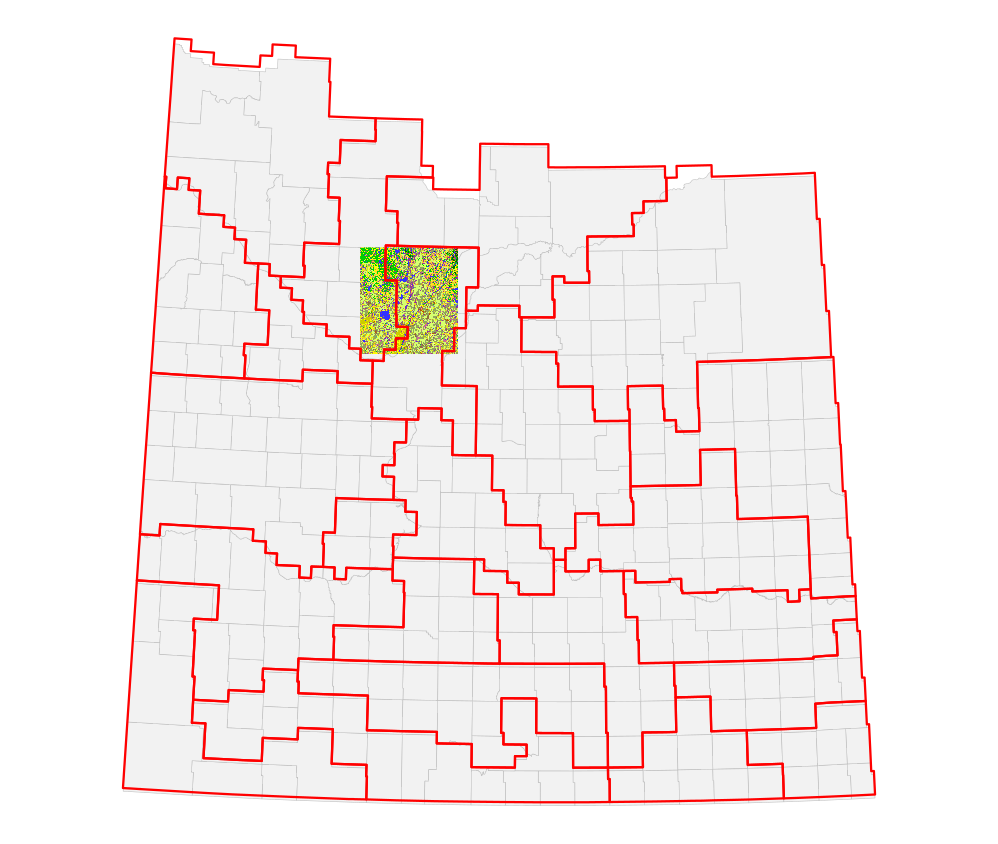
A map of Saskatchewan showing rural municipality boundaries in grey, a smaller number of risk zone boundaries drawn over them in red, and a small rectangular patch of crop inventory raster near the centre.
Figure 21.1: All three layers in the same coordinate system: the RM boundaries in grey, the risk zone boundaries in red, and the crop inventory raster in the centre of the province.

21.2 Operations with vector data

There are several functions that we can perform on vector data. They fall into three categories, which we will call measures, predicates and constructors. The table below summarizes these functions. Once again, you don’t need to memorize the names and the syntax of all these functions, but you do need to understand what they do and what they return.

Kind What you are asking Functions
Measures How big, how far st_area(), st_distance(), st_length()
Predicates How do these two shapes relate? st_intersects(), st_within(), st_contains(), st_touches(), st_disjoint()
Constructors Build a new shape out of existing ones st_intersection(), st_difference(), st_union(), st_buffer(), st_centroid()

21.2.1 Measures

Measures answer how big or how far. We transformed the layers to UTM metres above, so distances come back in metres and areas in square metres.

st_area()

st_area() calculates how large an area every geometry covers (in square metres). We can divide by 1,000,000 to get square kilometres. It can take as its argument a single geometry or an entire dataset. It will return the area of every polygon in the data.

##Calculate the area of every RM in square metres
area <- st_area(rms)
summary(area)

##Add a column to the data frame with the area in square kilometres
rms <- rms |>
  mutate(km2 = as.numeric(st_area(geometry)) / 1000000)

##Print the first few rows: we will see that the new km2 column is added
##at the end, after the geometry column
head(rms,4)

##Now summarize the area of all RMs in square kilometres 
summary(rms$km2)

##Note that the median RM is 856 square kilometres but the mean is 1,105.
##Most RMs are close to the same size, and a few large northern ones pull
##the mean up.
> ##Calculate the area of every RM in square metres
> area <- st_area(rms)
> summary(area)
     Min.   1st Qu.    Median      Mean   3rd Qu.      Max. 
5.563e+08 8.513e+08 8.560e+08 1.105e+09 1.042e+09 1.236e+10 
> 
> ##Add a column to the data frame with the area in square kilometres
> rms <- rms |>
+   mutate(km2 = as.numeric(st_area(geometry)) / 1000000)
> 
> ##Print the first few rows: we will see that the new km2 column is added
> ##at the end, after the geometry column
> head(rms,4)
Simple feature collection with 4 features and 3 fields
Geometry type: MULTIPOLYGON
Dimension:     XY
Bounding box:  xmin: 253870.1 ymin: 5458917 xmax: 369182 ymax: 5724658
Projected CRS: WGS 84 / UTM zone 13N
  rmno                 rmnm                       geometry      km2
1  288      PLEASANT VALLEY MULTIPOLYGON (((255278.3 57... 853.4296
2  167 SASKATCHEWAN LANDING MULTIPOLYGON (((297290.6 56... 840.3796
3   46       GLEN MCPHERSON MULTIPOLYGON (((310333.8 54... 853.0538
4   75          PINTO CREEK MULTIPOLYGON (((369182 5516... 854.5847
> 
> ##Now summarize the area of all RMs in square kilometres 
> summary(rms$km2)
   Min. 1st Qu.  Median    Mean 3rd Qu.    Max. 
  556.3   851.3   856.0  1104.7  1042.2 12361.0 
> 
> ##Note that the median RM is 856 square kilometres but the mean is 1,105.
> ##Most RMs are close to the same size, and a few large northern ones pull
> ##the mean up.

Areas come out slightly different depending on the projection the layer is in. Every projection distorts something when it flattens the curved earth onto a plane, so the area measured on the UTM grid is not quite the area measured on the globe – for an RM the gap is well under one percent. Neither answer is wrong, but it does mean you should not compare an area measured in one projection against an area measured in another.

st_distance()

st_distance() calculates how far each geometry in the data is from another geometry. The following code determines how far each RM is from the Rosedale RM

##First extract the Rosedale RM
rosedale <- filter(rms, rmno == 283)

##Calculate the distance from every RM to Rosedale, in metres
distance_to_rosedale <- st_distance(rms, rosedale)

##Add a column that contains the distance in kilometres to Rosedale
rms <- rms |>
  mutate(dist_to_rosedale_km = as.numeric(distance_to_rosedale) / 1000)

summary(rms$dist_to_rosedale_km)
> ##First extract the Rosedale RM
> rosedale <- filter(rms, rmno == 283)
> 
> ##Calculate the distance from every RM to Rosedale, in metres
> distance_to_rosedale <- st_distance(rms, rosedale)
> 
> ##Add a column that contains the distance in kilometres to Rosedale
> rms <- rms |>
+   mutate(dist_to_rosedale_km = as.numeric(distance_to_rosedale) / 1000)
> 
> summary(rms$dist_to_rosedale_km)
   Min. 1st Qu.  Median    Mean 3rd Qu.    Max. 
    0.0   111.2   174.9   170.5   225.9   402.9 

Rosedale is zero kilometres from itself and the farthest RM is Argyle, 403 km away. Distance is measured between the nearest edges of two polygons rather than between their centres, so every RM that shares a border with Rosedale comes out at zero too.

21.2.2 Predicates

Predicates ask how two shapes relate. What they return is simply a list of row numbers, which are the polygons that match the condition the function tests.

st_touches()

st_touches() finds the geometries that share a border. The arguments are two layers. If the first layer is a single geometry, the function will find all geometries in the second layer that touch it. If the first layer has multiple geometries, we get one entry back for each of them. Passing all 296 RMs as the first argument returns a list of 296 entries, where the first entry holds the row numbers of every RM that borders the first RM, and so on. Note that this can be a bit finicky as the polygons have to exactly touch (share a border) – if they are even a tiny bit apart, or a tiny bit overlapping, they will not be counted as touching.

##First extract the Wheatlands RM
wheatlands <- filter(rms, rmno == 163)

##A list with one entry per row of the first layer, holding row numbers
neighbours <- st_touches(wheatlands, rms)
neighbours

##Use those row numbers to pull out the RMs themselves
bordering <- rms[neighbours[[1]], ]
bordering
> ##First extract the Wheatlands RM
> wheatlands <- filter(rms, rmno == 163)
> 
> ##A list with one entry per row of the first layer, holding row numbers
> neighbours <- st_touches(wheatlands, rms)
> neighbours
Sparse geometry binary predicate list of length 1, where the predicate
was `touches'
 1: 8, 103, 116, 148, 154, 252
> 
> ##Use those row numbers to pull out the RMs themselves
> bordering <- rms[neighbours[[1]], ]
> bordering
Simple feature collection with 6 features and 4 fields
Geometry type: MULTIPOLYGON
Dimension:     XY
Bounding box:  xmin: 369705.9 ymin: 5544060 xmax: 476467.8 ymax: 5636714
Projected CRS: WGS 84 / UTM zone 13N
    rmno         rmnm                       geometry      km2
8    164      CHAPLIN MULTIPOLYGON (((370561.7 56... 899.7099
103  132 HILLSBOROUGH MULTIPOLYGON (((428449.3 55... 633.6616
116  133      RODGERS MULTIPOLYGON (((399079.4 55... 855.2506
148  193      EYEBROW MULTIPOLYGON (((429253.5 56... 855.6827
154  162        CARON MULTIPOLYGON (((428852.5 56... 593.6172
252  191      MARQUIS MULTIPOLYGON (((429318 5636... 837.6624
    dist_to_rosedale_km
8              87.43385
103           118.24380
116           116.56148
148            58.27705
154            89.63272
252            56.92400

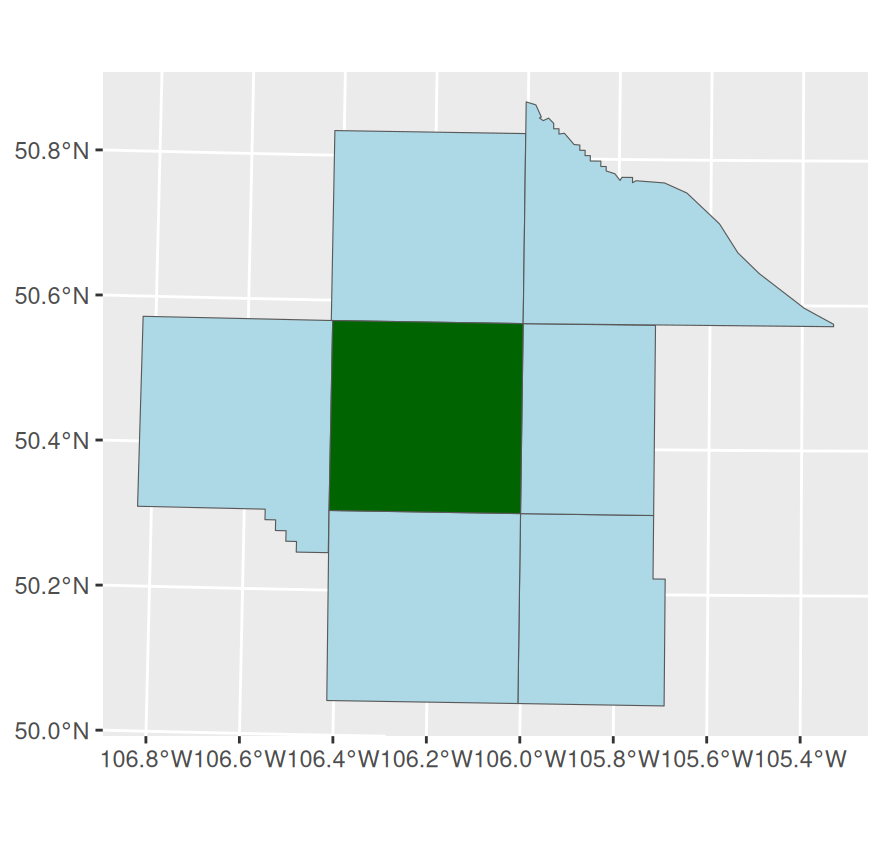
In the code, st_touches() returns a list with one entry, holding the row numbers of the RMs that share a border with Wheatlands. neighbours[[1]] pulls that entry out as a plain vector of numbers, which we can use to pull out the RMs themselves, giving us the data frame bordering. We can now plot the bordering RMs.

ggplot() +
  geom_sf(data = bordering, fill = "lightblue") +
  geom_sf(data = wheatlands, fill = "darkgreen")
A map of part of southern Saskatchewan with one municipality shaded dark green and the six municipalities surrounding it shaded light blue.
Figure 21.2: Wheatlands in dark green and the six RMs that share a border with it in blue.

st_intersects()

st_intersects() operates similar to st_touches(), but instead of finding RMs that share a border, it finds the geometries that share common ground. For example, we could use it to find all the RMs that are in a particular risk zone (a risk zone contains many RMs). The code below finds all the RMs that fall in risk zone 12. And then plots these RMs in blue, with the risk zone boundary in red.

##Extract risk zone 12
zone12 <- filter(zones, risk_zone == 12)

##Which RMs share any ground with it?
hit <- st_intersects(zone12, rms)

##Use those row numbers to pull out the RMs themselves
in_zone12 <- rms[hit[[1]], ]
nrow(in_zone12)
head(in_zone12$rmnm)
> ##Extract risk zone 12
> zone12 <- filter(zones, risk_zone == 12)
> 
> ##Which RMs share any ground with it?
> hit <- st_intersects(zone12, rms)
> 
> ##Use those row numbers to pull out the RMs themselves
> in_zone12 <- rms[hit[[1]], ]
> nrow(in_zone12)
[1] 26
> head(in_zone12$rmnm)
[1] "ROSEDALE"   "CANAAN"     "MORRIS"     "MCCRANEY"   "LOST RIVER"
[6] "WOOD CREEK"
ggplot() +
  geom_sf(data = in_zone12, fill = "lightblue", colour = "grey40") +
  geom_sf(data = zone12, fill = NA, colour = "red", linewidth = 0.8) +
  theme_void()
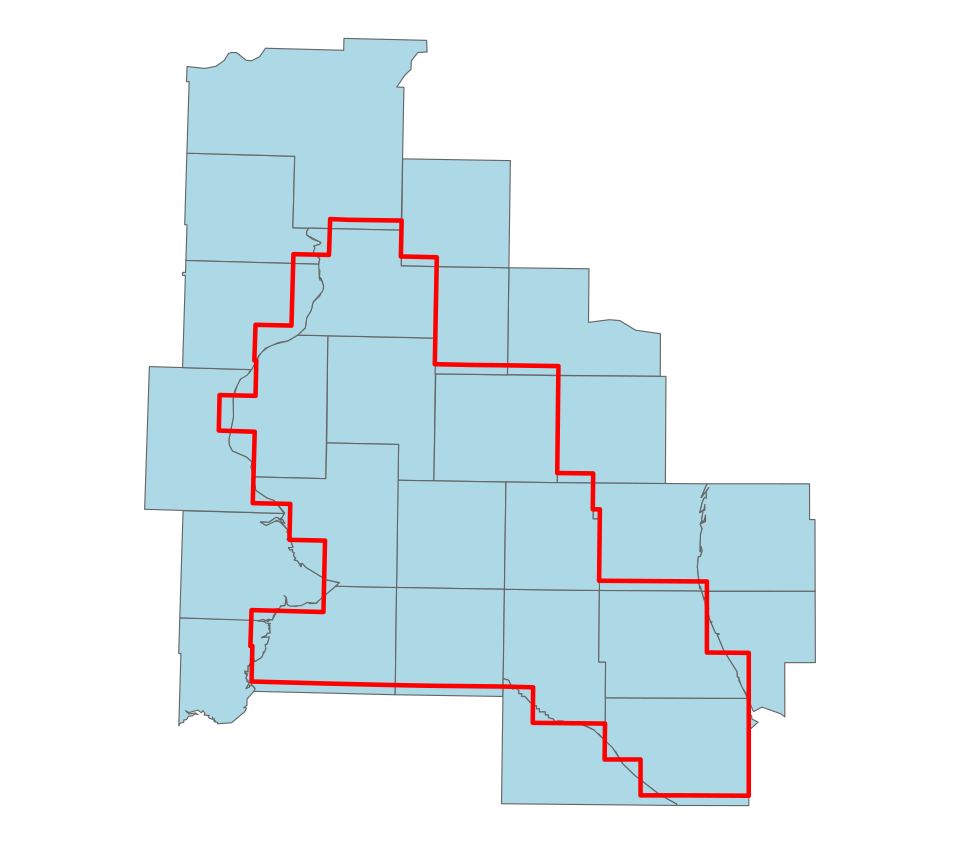
A map of part of Saskatchewan with twenty-six municipalities shaded blue and a single large red outline drawn over them, the outline cutting through the municipalities around its edge.
Figure 21.3: The 26 RMs that share ground with risk zone 12, in blue, with the zone boundary in red. RMs along the edge are only partly inside the zone.

Notice that the RMs around the edge stick out past the red line. st_intersects() counts an RM if any part of it falls in the zone, so the 26 RMs are not all wholly inside it.

21.2.3 Constructors

Constructors return new geometry rather than an answer about existing geometry.

st_intersection()

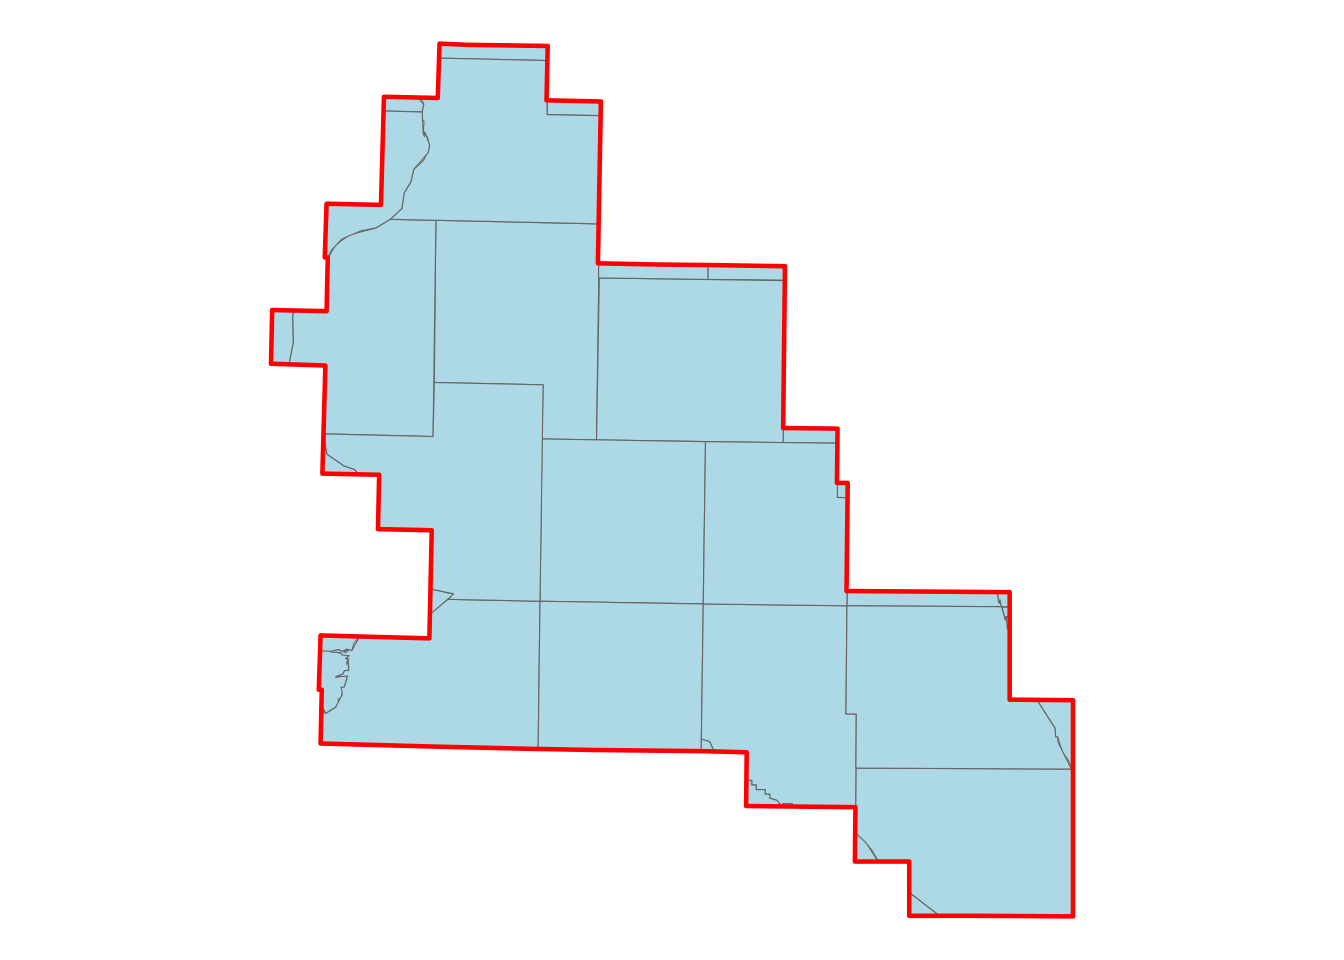
st_intersection() creates new geometries that include land that are in both layers. For example, if we run st_intersection() with one argument as risk zone 12 and the other as the rms data, what we will have returned is a new dataset. The geometries in this dataset will be all the parts of each RM that are in risk zone 12:

  • Most rms are not in risk zone 12 at all, so they will not appear in the new dataset.
  • Some RMs are wholly in risk zone 12, so they will appear in the new dataset with their original geometry.
  • Some RMs are partly in risk zone 12, so they will appear in the new dataset. However, their geometry will be changed to only include the part of the RM that is in risk zone 12.

The following code illustrates this example, running st_intersection() with zone 12 and the rm data as its argument. What is returned is a new dataset, which we then plot along with the risk zone boundary.

##Cut the 26 RMs at the zone boundary
zone12_rms <- st_intersection(zone12, rms)

ggplot() +
  geom_sf(data = zone12_rms, fill = "lightblue", colour = "grey40") +
  geom_sf(data = zone12, fill = NA, colour = "red", linewidth = 0.8) +
  theme_void()
> ##Cut the 26 RMs at the zone boundary
> zone12_rms <- st_intersection(zone12, rms)
Warning: attribute variables are assumed to be spatially constant throughout all geometries
> 
> ggplot() +
+   geom_sf(data = zone12_rms, fill = "lightblue", colour = "grey40") +
+   geom_sf(data = zone12, fill = NA, colour = "red", linewidth = 0.8) +
+   theme_void()

Note the difference between Figure 21.3 and the plot above. In Figure 21.3, the RMs are shown in their entirety, even if they are only partly in the zone. In the plot above, the RMs have been cut at the zone boundary, so we only see the parts of them that are in the zone.

Cutting like this is worth the trouble whenever an RM straddles a boundary. Assigning each RM to a single zone is the quick answer, and it throws information away: Rosedale would be recorded as zone 12, with nothing left to say that 1.2 square kilometres of it are in zone 18. When the question is “which zone is this RM in”, that is fine. When the question is “how much of this RM is in each zone”, keep the pieces.

Doing it for the whole province shows the scale of it:

pieces <- st_intersection(rms, zones)

# More rows than either input: one per overlapping pair
nrow(rms)
nrow(zones)
nrow(pieces)
> pieces <- st_intersection(rms, zones)
Warning: attribute variables are assumed to be spatially constant throughout all geometries
> 
> # More rows than either input: one per overlapping pair
> nrow(rms)
[1] 296
> nrow(zones)
[1] 23
> nrow(pieces)
[1] 559

296 RMs and 23 zones give 559 pieces, because 200 of the 296 RMs are split by a zone boundary.

This is the operation to reach for when a quantity is reported on one geography and needed on another. If you know production by RM and need it by risk zone, cut the RMs by the zones, work out each piece’s share of its RM, and apportion the production by that share. The arithmetic is easy; the assumption is that production is spread evenly across the RM, which is a judgement about the data rather than something the geometry can tell you.

st_difference()

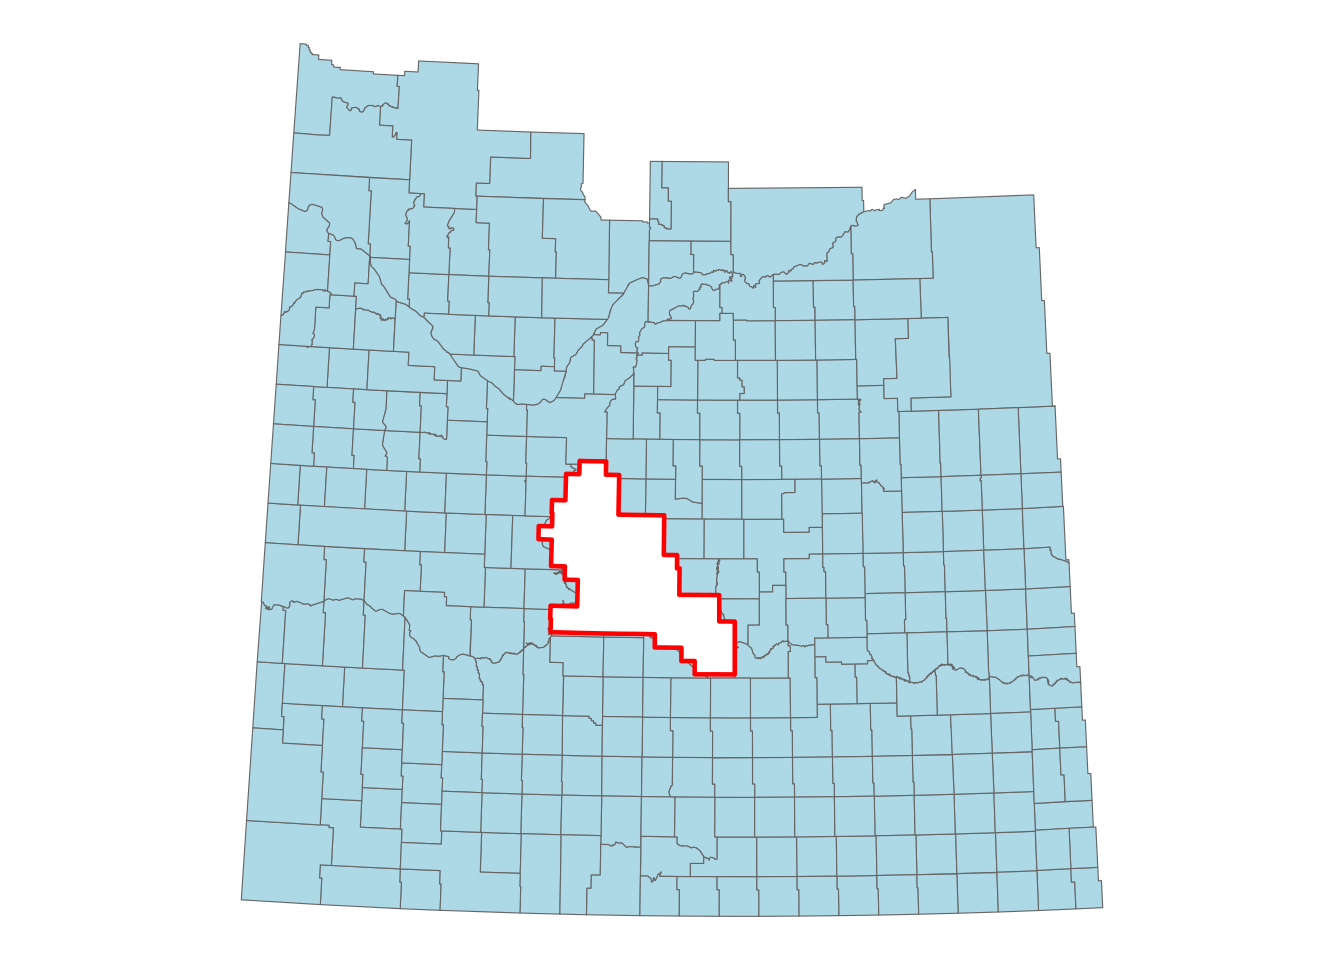
st_difference() is the opposite of st_intersection(). It creates new geometries that include land that is in the first layer but not in the second. So in our example, if we use st_difference() with the first argument rms and the second argument risk zone 12, then we will return a dataset with the geometry of every rm that is not in risk zone 12.

  • For most RMs this will be their entire geometry, because they are not in risk zone 12 at all.
  • For those entirely in risk zone 12, they will not appear in the new dataset at all.
  • For those partly in risk zone 12, they will appear in the new dataset, but their geometry will be changed to only include the part of the RM that is not in risk zone 12.

##Remove the part of every RM that lies in zone 12
not_zone12_rms <- st_difference(rms, zone12)

ggplot() +
  geom_sf(data = not_zone12_rms, fill = "lightblue", colour = "grey40") +
  geom_sf(data = zone12, fill = NA, colour = "red", linewidth = 0.8) +
  theme_void()
> ##Remove the part of every RM that lies in zone 12
> not_zone12_rms <- st_difference(rms, zone12)
Warning: attribute variables are assumed to be spatially constant throughout all geometries
> 
> ggplot() +
+   geom_sf(data = not_zone12_rms, fill = "lightblue", colour = "grey40") +
+   geom_sf(data = zone12, fill = NA, colour = "red", linewidth = 0.8) +
+   theme_void()

st_buffer()

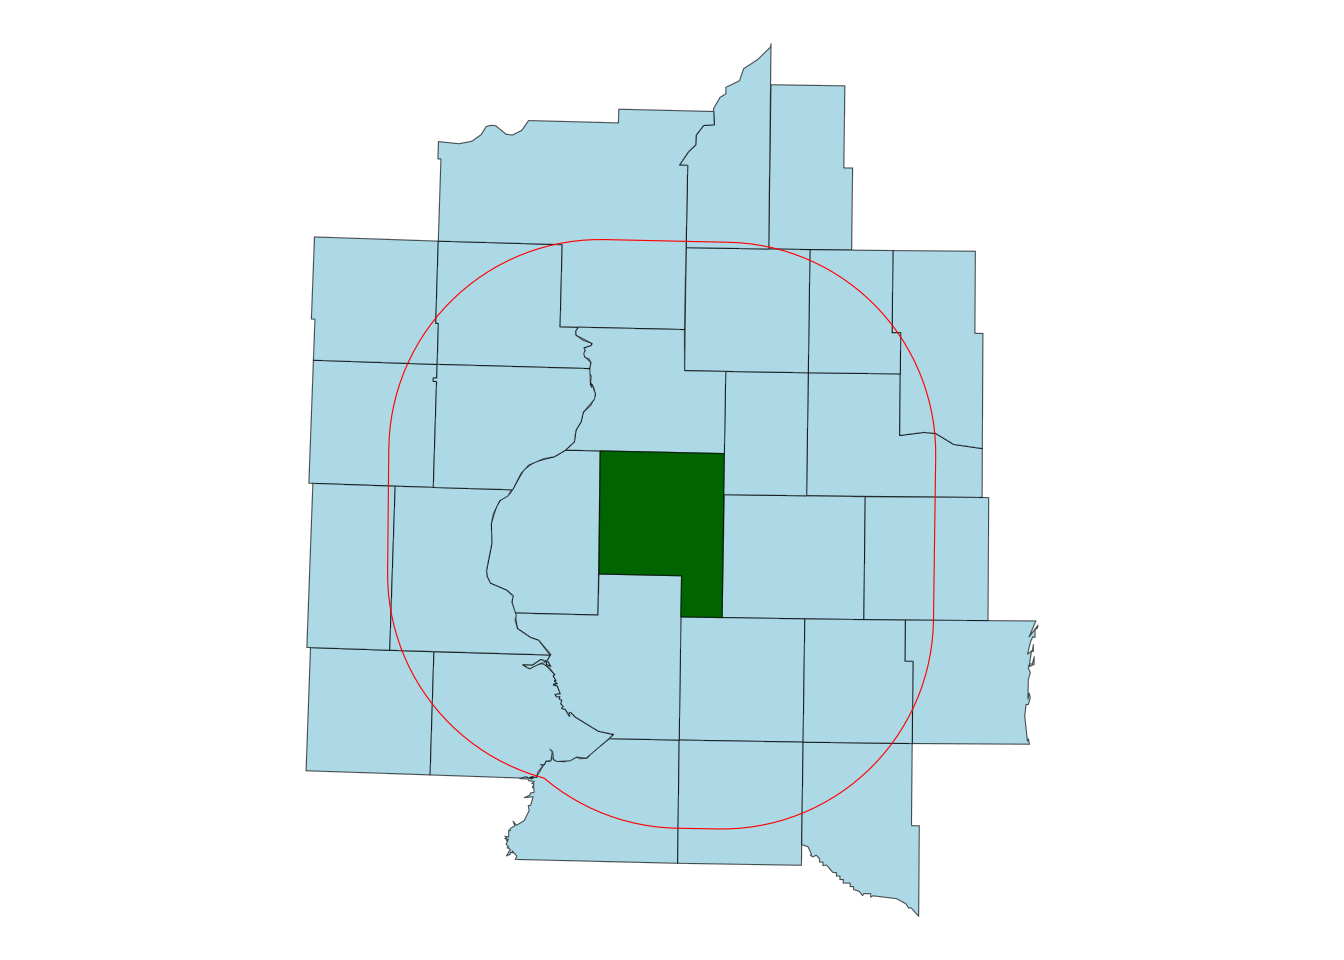
st_buffer() grows a geometry by a distance in every direction. For example, let’s say that we want to plot all RMs that are within 50km of Rosedale RM. We could create a new geometry by expanding Rosedale by 50km in every direction, and then use st_intersects() to find all RMs that intersect with that new geometry. Then plot all those RMs.

##Grow Rosedale by 50 km in every direction
ring <- st_buffer(rosedale, 50000)

##A buffer is just a polygon, so it has an area like any other
as.numeric(st_area(ring)) / 1e6

##Which RMs share any ground with it?
near_rosedale <- rms[lengths(st_intersects(rms, ring)) > 0, ]
nrow(near_rosedale)
head(near_rosedale$rmnm)

##Plot the RMs near rosedale, then rosedale itself in dark green, then the buffer in red
ggplot() +
  geom_sf(data = near_rosedale, fill = "lightblue") +
  geom_sf(data = rosedale, fill = "darkgreen") +
  geom_sf(data = ring, fill = NA, colour = "red") +
  theme_void()
> ##Grow Rosedale by 50 km in every direction
> ring <- st_buffer(rosedale, 50000)
> 
> ##A buffer is just a polygon, so it has an area like any other
> as.numeric(st_area(ring)) / 1e6
[1] 15331.35
> 
> ##Which RMs share any ground with it?
> near_rosedale <- rms[lengths(st_intersects(rms, ring)) > 0, ]
> nrow(near_rosedale)
[1] 28
> head(near_rosedale$rmnm)
[1] "HARRIS"      "ROSEDALE"    "KING GEORGE" "MORRIS"      "MCCRANEY"   
[6] "LOST RIVER" 
> 
> ##Plot the RMs near rosedale, then rosedale itself in dark green, then the buffer in red
> ggplot() +
+   geom_sf(data = near_rosedale, fill = "lightblue") +
+   geom_sf(data = rosedale, fill = "darkgreen") +
+   geom_sf(data = ring, fill = NA, colour = "red") +
+   theme_void()

The buffer covers 15,331 square kilometres, and twenty-eight RMs reach into it, Rosedale included. Most of them also extend well past it. Note that the buffer is not a circle: st_buffer() grows the whole RM outwards, so the result is Rosedale’s own shape with rounded corners. A buffer is an ordinary polygon, so it goes straight back into a predicate, which is what the st_intersects() line does.

Note that an RM counts if the buffer clips any part of it, because st_intersects() is that loose a test. Only 8 of the 28 are wholly inside. If those are the ones you want, st_within() is the predicate to use.

st_union()

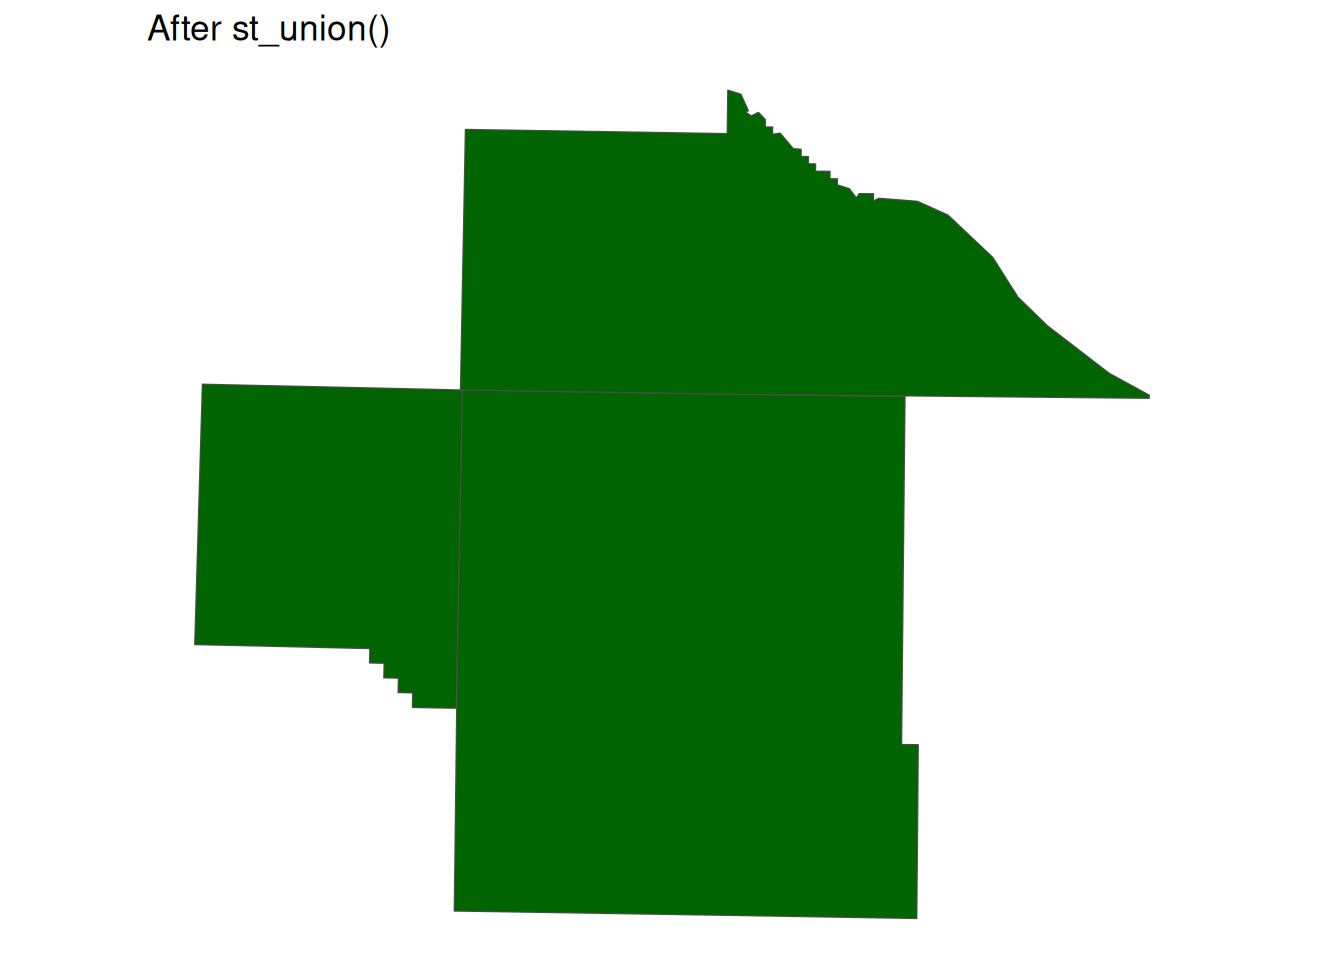
st_union() merges several geometries into one. The following code merges Wheatlands and the six RMs that border it.

##Wheatlands and the six RMs that border it
group <- rms[c(which(rms$rmno == 163), neighbours[[1]]), ]
nrow(group)

##Merge them
merged <- st_union(group)

ggplot(merged) +
  geom_sf(fill = "darkgreen", colour = "grey30") +
  labs(title = "After st_union()") +
  theme_void()
> ##Wheatlands and the six RMs that border it
> group <- rms[c(which(rms$rmno == 163), neighbours[[1]]), ]
> nrow(group)
[1] 7
> 
> ##Merge them
> merged <- st_union(group)
> 
> ggplot(merged) +
+   geom_sf(fill = "darkgreen", colour = "grey30") +
+   labs(title = "After st_union()") +
+   theme_void()

The merge is not quite clean. st_union() does dissolve a border that two polygons genuinely share, so the seams that remain are telling us the boundaries do not quite coincide: along parts of their length these RMs overlap each other slightly, by about 0.03 square kilometres in total. Growing each one by a metre before merging closes the gaps, at the cost of also pushing the outside edge out by a metre:

##Grow each RM by one metre, then merge
merged_clean <- st_union(st_buffer(group, 1))

##The outline is shorter now, because the internal borders are gone
as.numeric(st_length(st_boundary(merged))) / 1000
as.numeric(st_length(st_boundary(merged_clean))) / 1000
> ##Grow each RM by one metre, then merge
> merged_clean <- st_union(st_buffer(group, 1))
> 
> ##The outline is shorter now, because the internal borders are gone
> as.numeric(st_length(st_boundary(merged))) / 1000
[1] 556.3655
> as.numeric(st_length(st_boundary(merged_clean))) / 1000
[1] 437.6238

556 kilometres of boundary becomes 438. Real boundary files are full of small discrepancies like this, and they are worth checking for rather than assuming a union came out clean.

21.3 Operations with a raster and a vector layer

Recall that a raster is a grid of cells, each with a single value. For example, in the crop inventory data, the values represent the type of crop grown. In other datasets, the values might represent yields, or rainfall, or elevation.

We commonly want to combine raster and vector data. We may want to do this just to plot the raster data within a particular polygon. Or we may want to do calculations for a particular polygon. For example, we might want to use the crop inventory raster to calculate how much of a particular crop was grown in a particular RM. Or the fraction of an RM planted with each crop.

21.3.1 Cutting a raster with a polygon

The first thing we will learn is how to cut a raster down to a polygon. This is done in two steps, using the functions crop() and mask().

  • crop() trims the raster to the polygon’s bounding box: the smallest rectangle that contains the whole polygon.
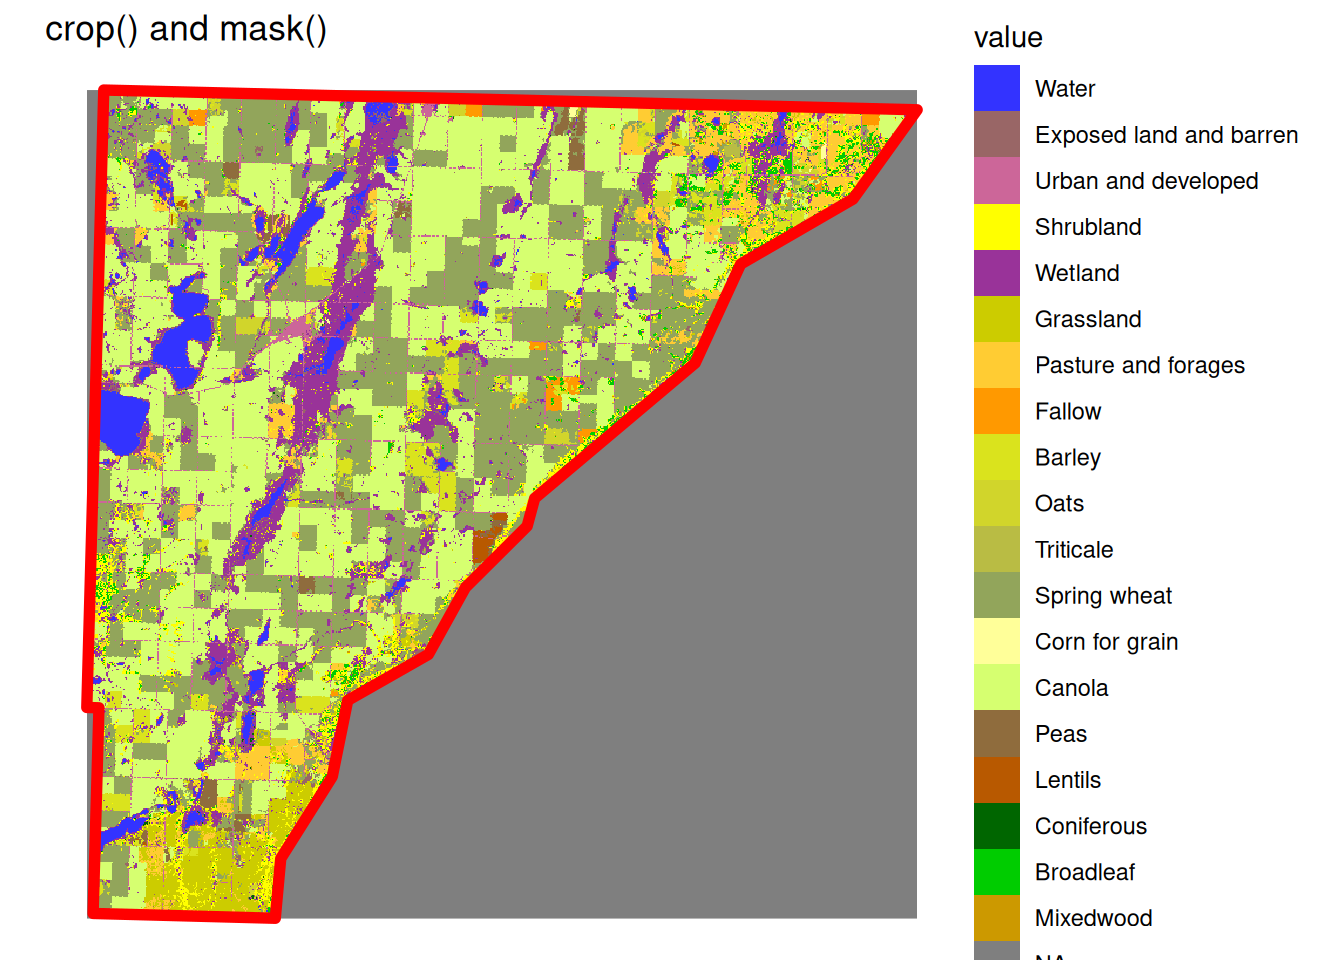
  • mask() sets every cell outside the polygon itself to NA.

Let’s start with crop(). The code below trims a crop inventory raster to the bounding box of the RM of Blaine Lake, whose eastern boundary follows the North Saskatchewan River.

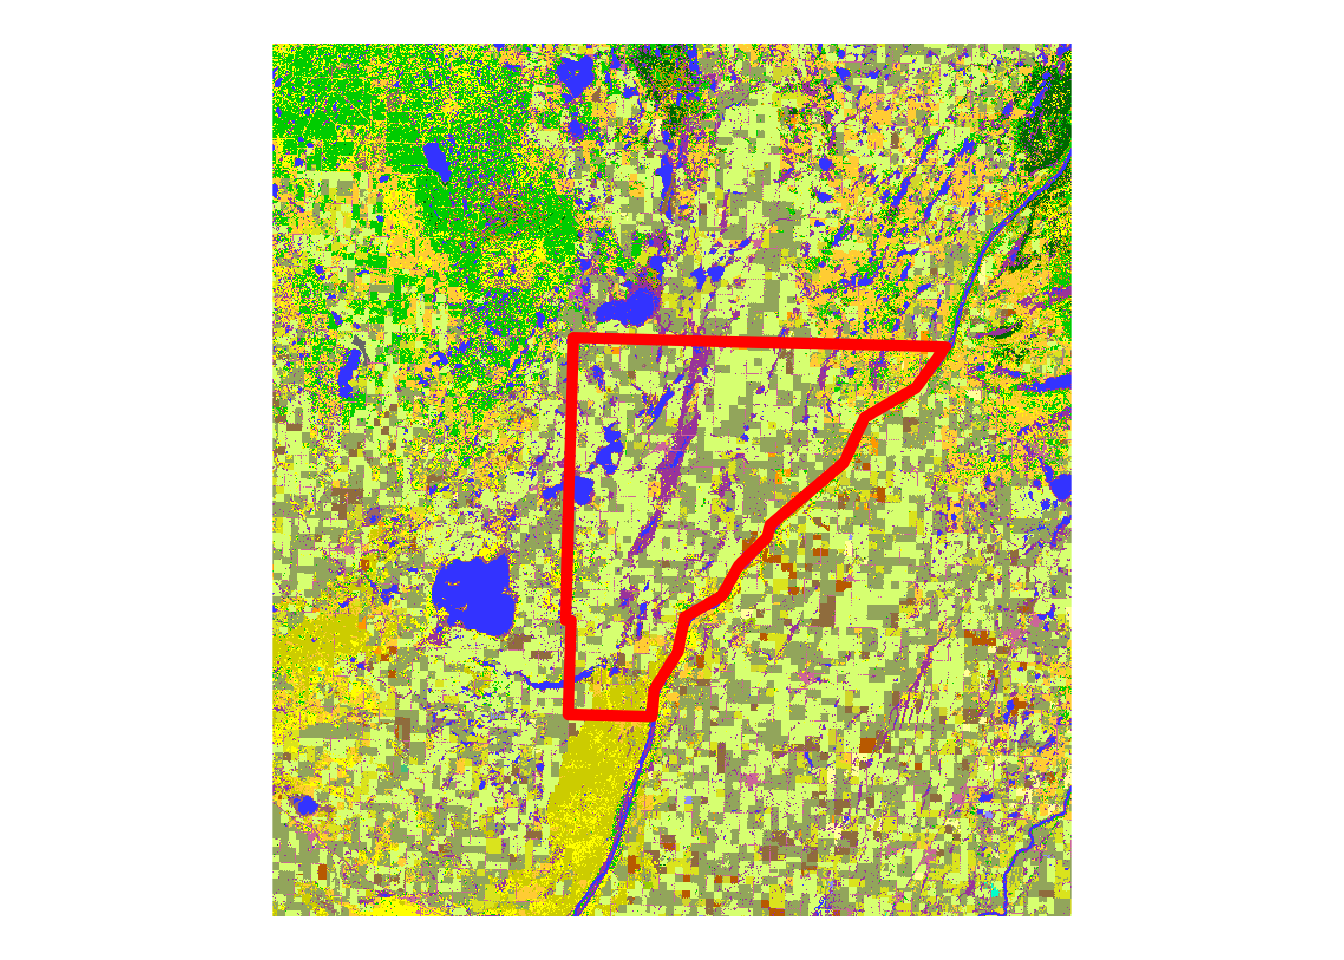
Let’s start by plotting the RM and the crop inventory data together without cropping:

##The RM of Blaine Lake
blaine <- filter(rms, rmnm == "BLAINE LAKE")

ggplot() +
  geom_spatraster(data = aci) +
  scale_fill_manual(values = setNames(classes$colour, classes$crop), guide = "none") +
  geom_sf(data = blaine, fill = NA, colour = "red", linewidth=2) +
  theme_void()
> ##The RM of Blaine Lake
> blaine <- filter(rms, rmnm == "BLAINE LAKE")
> 
> ggplot() +
+   geom_spatraster(data = aci) +
+   scale_fill_manual(values = setNames(classes$colour, classes$crop), guide = "none") +
+   geom_sf(data = blaine, fill = NA, colour = "red", linewidth=2) +
+   theme_void()
<SpatRaster> resampled to 500303 cells.

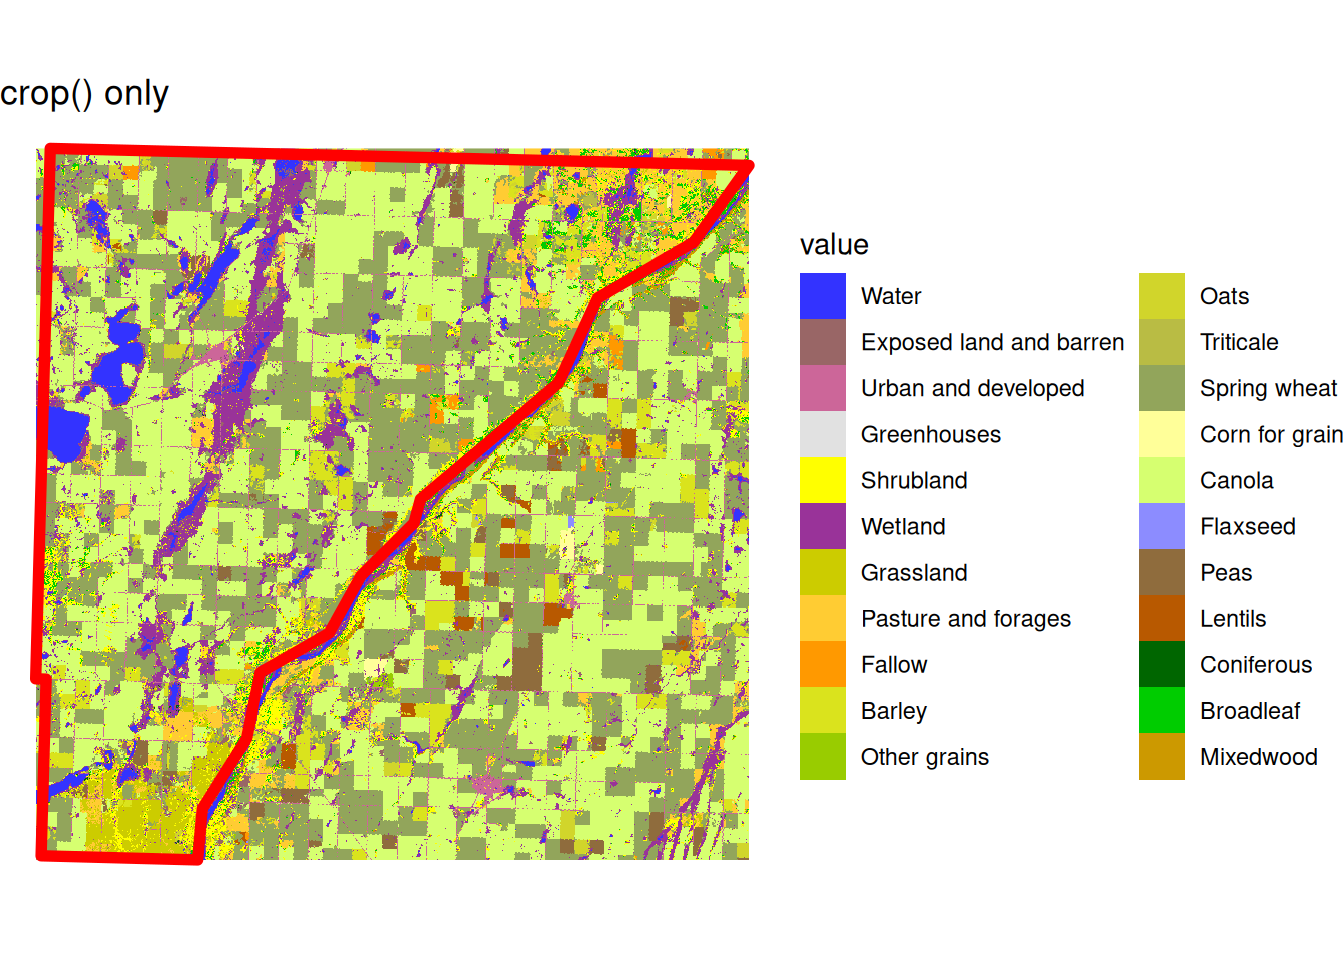
Now let’s use crop to trim the raster to the bounding box of the RM, and plot the resulting raster and the RM boundary together.

##Trim the raster to the bounding box of the RM
aci_box <- crop(aci, blaine)

ggplot() +
  geom_spatraster(data = aci_box) +
  scale_fill_manual(values = setNames(classes$colour, classes$crop)) +
  geom_sf(data = blaine, fill = NA, colour = "red", linewidth=2) +
  labs(title = "crop() only") +
  theme_void() 
> ##Trim the raster to the bounding box of the RM
> aci_box <- crop(aci, blaine)
> 
> ggplot() +
+   geom_spatraster(data = aci_box) +
+   scale_fill_manual(values = setNames(classes$colour, classes$crop)) +
+   geom_sf(data = blaine, fill = NA, colour = "red", linewidth=2) +
+   labs(title = "crop() only") +
+   theme_void() 
<SpatRaster> resampled to 500556 cells.

With crop we can see that we have trimmed the raster data to the smallest rectangle that contains every point in the RM. However, we can also see that there are many cells in the rectangle that fall outside the RM. If we want to only keep the cells that fall inside the RM, we need to use mask().

##Blank the cells that fall outside the RM
aci_rm <- mask(aci_box, blaine)

ggplot() +
  geom_spatraster(data = aci_rm) +
  scale_fill_manual(values = setNames(classes$colour, classes$crop)) +
  geom_sf(data = blaine, fill = NA, colour = "red", linewidth=2) +
  labs(title = "crop() and mask()") +
  theme_void()
> ##Blank the cells that fall outside the RM
> aci_rm <- mask(aci_box, blaine)
> 
> ggplot() +
+   geom_spatraster(data = aci_rm) +
+   scale_fill_manual(values = setNames(classes$colour, classes$crop)) +
+   geom_sf(data = blaine, fill = NA, colour = "red", linewidth=2) +
+   labs(title = "crop() and mask()") +
+   theme_void()
<SpatRaster> resampled to 500556 cells.

21.3.2 Measuring raster values within a polygon

We may also want to summarize the values of a raster within a polygon. For example, we might want to know what fraction of an RM is planted with each crop. For this we can use the function exact_extract() from the exactextractr package. This function takes three arguments:

  1. A raster data
  2. A polygon or set of vector data
  3. The type of operation that we want performed on the raster values within the polygon. Operations include:
    • frac: the fraction of the polygon that is covered by each raster value
    • mean: the mean of the raster values within the polygon
    • sum: the sum of the raster values within the polygon
    • mode: the most common raster value within the polygon

In our particular case, the data are categorical – each number represents a crop. So taking the sum or average doesn’t really make sense. What we want to know is the fraction of the RM that is planted with each crop. For this we can use the frac operation. The code below shows how to do this for the RM of Blaine Lake.

library(exactextractr)

##The share of each class in each RM. 
shares <- exact_extract(aci, blaine, "frac")

##One row per RM, one column per class
shares
> library(exactextractr)
> 
> ##The share of each class in each RM. 
> shares <- exact_extract(aci, blaine, "frac")
> 
> ##One row per RM, one column per class
> shares
     frac_20     frac_30    frac_34    frac_50  frac_80   frac_110   frac_122
1 0.04084556 0.007497018 0.02647296 0.04246157 0.103777 0.02930001 0.04320685
     frac_131   frac_133    frac_136     frac_139  frac_146     frac_147
1 0.004960495 0.03162631 0.008100964 0.0005725671 0.2690773 0.0005602896
   frac_153    frac_162    frac_174     frac_210   frac_220    frac_230
1 0.3588082 0.007900468 0.002035196 0.0006185878 0.01778135 0.004397219

What we get printed out is a row in which each column is the fraction of the Blaine Lake RM that is planted with a particular crop. Each column is named frac_## where ## a numeric code that represents a crop. The largest fraction is frac_153; about 36% of the RM is planted with crop 153, which stands for canola.

Of course, it doesn’t look very nice to have the crop codes as column names. There are fairly straightforward ways to clean this up, but we will leave that for later (or for AI).